For the past week I’ve been officially on a break for paternity leave. Blessed with an excellent sleep schedule I’ve had time to dedicate to working on my homelab. One long-standing item on the to-do list was to implement HA after a control plane failure caused me to lose the cluster itself. Luckily recovering the first time wasn’t a difficult exercise as I manage it all via Terraform, but in true DevOps fashion – why cure, when you can prevent.
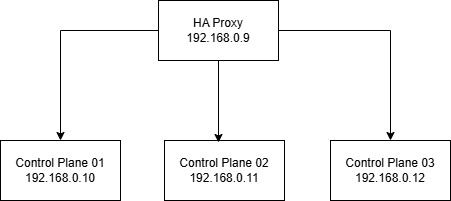
The overall network design of this setup will look like this:
Read on to see how I accomplished this.
Configure the K3s Control plane node(s)
Firstly, I’m choosing to use Embedded Etcd (see https://docs.k3s.io/datastore/ha-embedded). For this, I require 3 Control Plane nodes to provide quorum. When 3 nodes are present, a load balancer is required to provide round-robin resolution of the nodes to contact the API regardless of which node(s) may or may not be up at the time.
I set up the first Control Plane node with the following command:
curl -sfL https://get.k3s.io | K3S_TOKEN= sh -s - server --cluster-init --disable=traefik --write-kubeconfig-mode 644 --node-name controller01
The key part in the above command is --cluster-init which tells the setup we’re using HA embedded etcd.
And then optionally I can create the other two Control Plane nodes at this point. For now, I’ll skip this section and create the load balancer to sit in front.
I have a separate machine that exclusively runs Docker. I choose to do this to keep some workloads separate from my Kubernetes cluster. While the machine is a single-instance therefore being its own single point of failure, as I’m exclusively running docker containers, some downtime to install Ubuntu Server and rebuild the container(s) is acceptable in my home environment.
Next, we want to configure HAProxy & Keepalived to provide the load balancing capability.
Set up HAProxy & Keepalived
HAProxy works with KeepAlived to provide uptime for the load balancer. I use a Docker Compose file to group these two containers together, launch them together, and ensure they work in tandem.
The source code for the containers is here: https://github.com/Vedatechltd/haproxy-keepalived-lb
In the example code, I’m using the environment variables for the docker image instead of a config file due to issues in the way the container copies the file to use within the container.
Clone or mirror this repo and edit the values as appropriate to your own network
- In
haproxy.conf, edit the hostnames & IPs to the chosen IPs of your Control Plane nodes.
  server control01 192.168.0.10:6443 check
  server control02 192.168.0.11:6443 check
server control03 192.168.0.12:6443 check- Edit the
docker-compose.yamlfile to specify an IP on your network that you’ll use to access the cluster
KEEPALIVED_VIRTUAL_IPS: "192.168.0.9"Now we have a HAProxy Docker container that will always restart, including if the host reboots for any reason. Next, we want to communicate with our K3s cluster.
Download the .kubeconfig file for your cluster
Downloading the .kubeconfig file to your local machine(s) allows you to run kubectl commands from your machine rather than needing to SSH to one of the nodes.
- On Windows, change directory to
c:\users\youruser\.kubefirst. You may need to create the directory first if it doesn’t exist. If you’re on Linux, this location will be$HOME/.kube/ - Run
scp pi@<your primary Control Plane node>:/etc/rancher/k3s/k3s.yaml config. This will transfer the file to the above directory. - Open the file in an editor. Look for the line
server: https://127.0.0.1:6443. Edit this to the IP you set for your load balancer VIP. In the example code, this is192.168.0.9 - Run a
kubectl get pods -A -o widecommand. If done correctly, it should return the pods in your cluster.
You can now add as many Control Plane nodes as required and they will all be resolvable via the load balancer IP.
Summary
This guide should help you add redundancy and resilience to your home K3s cluster.
To sum up, in this article, we have:
- Created a K3s node
- Created a HAProxy & Keepalived container
- Downloaded & edited the
kubeconfigfile to point to the HAProxy IP